
 Hello people!
 Today I'll be sharing with you guys how to create a custom popular posts widget.
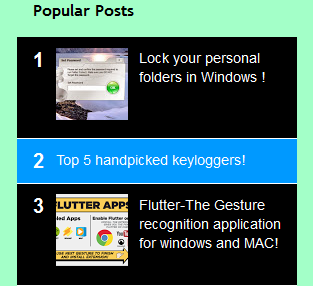
We all know that the popular posts widget blogger uses by default isn't so attractive.
First off, let's get to know the advantages of using a popular posts widget.
1.This widget allows users visiting your page, to view the most popular posts at a glance.
2.It also attracts visitors which would mean your blog could get an increased number of views and a higher income as a result.
Follow the steps to achieve an attractive popular posts widget
1.How to add a popular posts widget :
- Log in to your blogger account.
- Go to Blogger Dashboard.
- Click on the Layout Tab.
You will see the screen as in the picture given below:

4. Now click on Gadget. A small new popup window will open as shown in the picture below:

5. Scroll down and press Popular Posts.
6. The following screen will open in the same new window. Check both boxes encircled in red below. The image thumbnail option puts a small thumbnail beside the name of the post in this widget and the snippet allows brief info extracted from the post. We recommend that you display a maximum of 7 or 8 posts for this widget to avoid taking up more space on your webpage.

7. After messing with the controls and check boxes, click Save. As soon as you do this, the widget is saved to the layout and you need to click Save arrangement.

Now it's time for some styling as the default widget doesn't look so attractive.
2. How to style the widget:
1.Be sure to Backup your template in case anything at all goes wrong as we'll be editing some code.
2.Go to the Template tab and click Edit Html as shown below in the picture.

3. Press Ctrl+F and a search bar will appear. Search for the code given below.
4. As soon as you come across this piece of code, all you have to do is paste the following code before this.]]></b:skin>
.PopularPosts h2{
padding-right:.4em;
padding-left:1em
}
.popular-posts ul { padding-left: 0;
counter-reset: trackit;/*setting counter-reset*/
}
.popular-posts ul li {
border-bottom: 1px solid #ffffff;
list-style: none outside none !important;
margin-left: 0 !important;
overflow: hidden;
padding: 10px 0 !important;
transition: all 0.25s linear 0s;
counter-increment: trackit;/*setting counter-increment*/
}
.PopularPosts ul li:before{
content: counters(trackit, ".");
padding: 0 .1em 0 0;
font-size: 20px;
font-weight: bold;
color: #ffffff;
float:left;
margin-right:10px;
} /* creates counter before lists */
.PopularPosts li:first-child{
border-top:1px solid #000000
}
.PopularPosts li:nth-child(even)
{background:#0099ff
}/*define background color for even number lists*/
.PopularPosts li:nth-child(odd)
{background:#000000
}/* define background for odd number lists */
.PopularPosts .item-thumbnail {display: true!important}, .PopularPosts .item-snippet {
display: true!important}/* Hides Thumbnail and Snippet */
.PopularPosts a, .PopularPosts a:hover{
color:#ffffff;
font-size:.9rem
}
#PopularPosts1 li{
padding-right: 1em !important;
padding-left: 1em !important;
}
.widget.PopularPosts{padding:1.2em 0em !important}
5. Now click on Save Template. Thats it. You're done. Click on View Blog to see the changes. I hope you guys will love it!


No comments:
Post a Comment